Agentic Engineering: Spec-Driven Development
Spec-Driven Development (SDD) is the process of creating a living contract between human developers and coding agents where the Specification (the what and why) is deliberately decoupled from the Implementation (the how). SDD allows a human developer to become an architect who guides the agent to build and ship high quality software. In this blog I summarize my experience of using the SDD in software engineering. The prompts and the skills are from Paul’s SDD course — see the DeepLearning.AI course repo on GitHub.
Why Spec-Driven Development?
The problems I usually face with vibe coding are 1) lost chat histories and context and 2) lack of a shared architecture/dev contract. These usually result in poor coordination among our team members for complex and long development projects.
SDD is appropriate for projects with significant complexity if you can accomplish what you need in one short prompt, SDD will not provide any advantages.
My SDD Workflow at a Glance
The SDD workflow has two major layers: a one-time project initialization step (the Constitution) and a repeating feature loop.
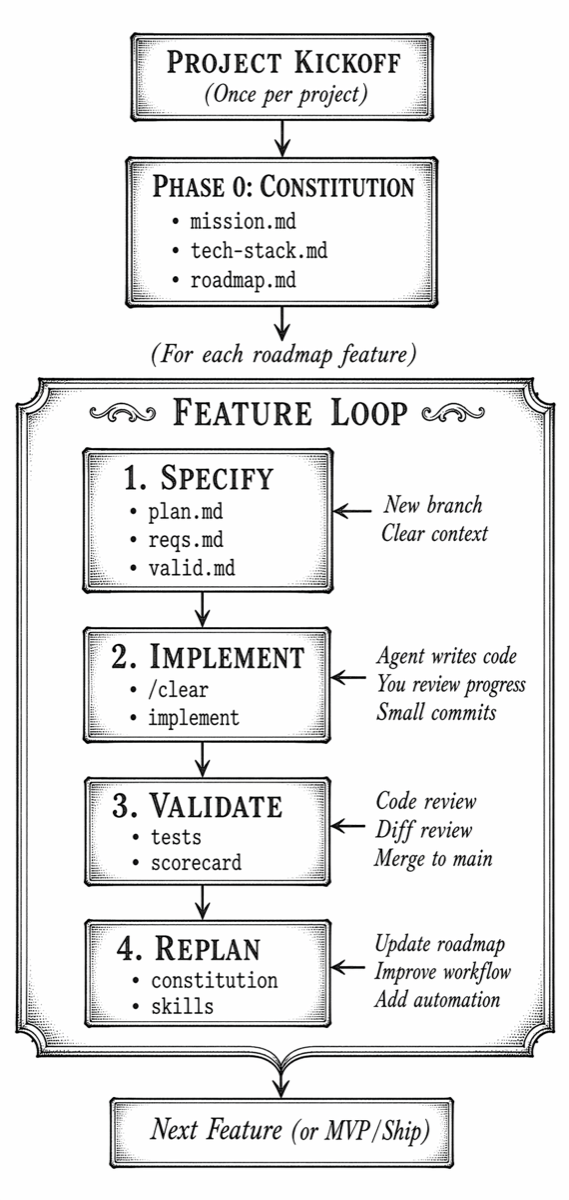
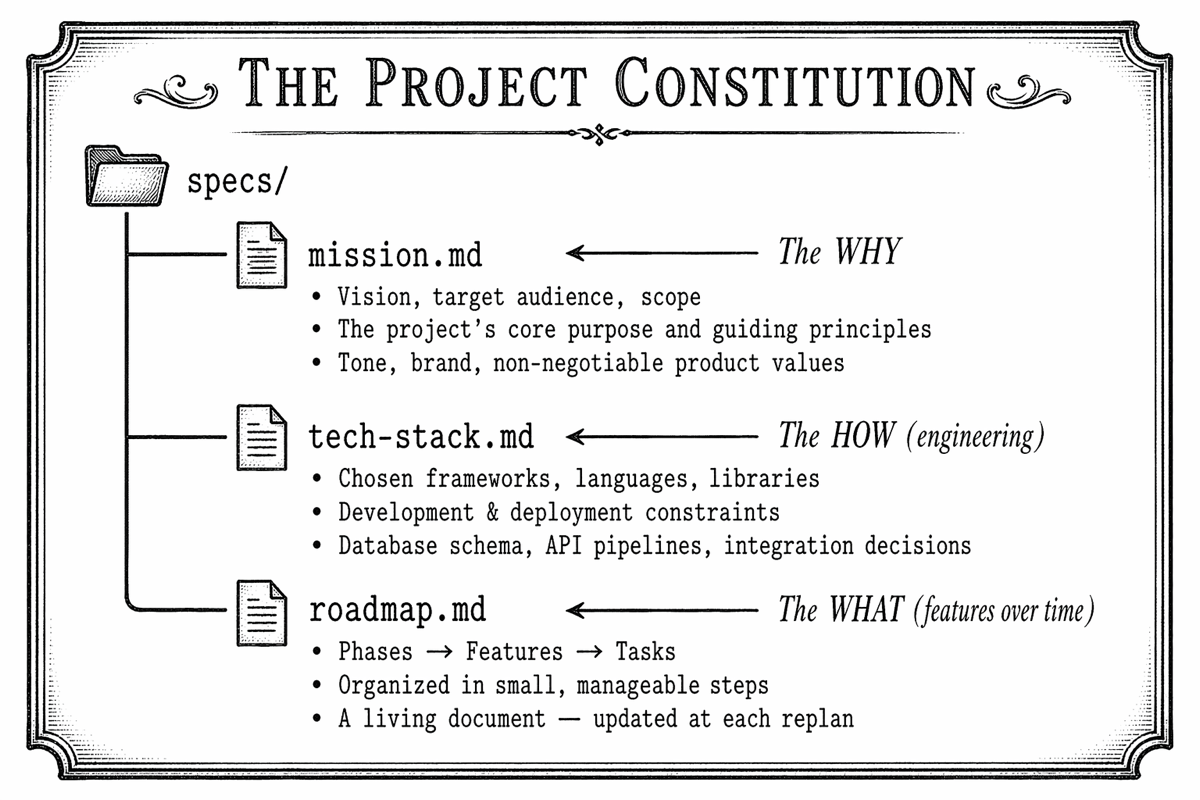
Phase 0: Create the Project Constitution
The Constitution is the agent-agnostic and structured foundation of the entire project. It is a global, high-level set of documents that captures the agreement between the developers in our team and the agent stored in a specs/ directory:
Step-by-Step: Drafting the Constitution
Step 1 — create the knowledge base
Before talking to the agent, I create a knowledge base for the project:
- Any existing READMEs, stakeholder notes, or product requirements
- Architecture documents, dev design documents
- Technical constraints from your organization (preferred languages, deployment targets)
- Your opinions on tech stack, testing frameworks, architecture patterns
Step 2 — create the constitution
I use a prompt similar to the following to build the constitution:
I am building a new web application. Help me create a Project
Constitution with three files in a specs/ directory:
  - mission.md: vision, audience, scope, guiding principles
  - tech-stack.md: frameworks, deployment, technical constraints
  - roadmap.md: phases and features, organized in small steps

Please read README.md for background context, then ask me
questions — one at a time — to clarify what you need.
Use the AskUserQuestion tool if available.
Step 3 — Q&A with agents
I usually find that the agent clarifies a few decisions that have been missed in the knowledge base, e.g., architecture patterns, external packages, speed-vs-fidelity trade-offs.
Step 4 — Human-in-the-loop review
In this stage, I review all three files and ask the agent to fix any gaps. I avoid making any changes manually to ensure that the whole constitution remains in sync.
The mission left out our target audience. Please add:
"The primary audience is internal engineering teams at
our organization." Also, use SQLite for this prototype.
Step 5 — Commit the Constitution
I commit the constitution to the repo.
Key insight: The Constitution is a living document. Version it and update it as the project evolves — always via the agent, in its own branch, so you can track which Constitution version produced which code.
Phase 1: Feature Specification
For every feature, I create the feature spec. This is the most important step in the loop — the key is not to rush it, but don’t micro-manage it either.
The Feature Spec Files
Each feature lives on its own branch and produces three spec files:
specs/feature-XX/
├── plan.md          ← Approach, task groups, sequence of work
├── requirements.md  ← Functional & non-functional requirements
└── validation.md    ← Scorecard: concrete success criteria
Step-by-Step: Feature Specification
Step 1 — a clean context and a new git branch
I always clear the agent’s context before starting which forces the agent loads everything it needs from the spec files — not from the memory of a previous session.
Step 2 — create a feature spec
Find the next phase on specs/roadmap.md and make a branch, ask me about the feature spec. Create:

A new directory YYYY-MM-DD-feature-name under specs for this feature work
In there:
plan.md as a series of numbered task groups.
requirements.md for the scope, decisions, context
validation.md for how to know the implementation succeeded and can be merged
Refer to specs/mission.md and specs/tech-stack.md for guidance.

Important: You must use your AskUserQuestion tool, grouped on these 3, before writing to disk.
Step 3 — Make decisions at the right altitude
The agent usually asks for key architectural and product decisions. The key is to steer at a high level (goals, missions) and not to over-specify (e.g., variable name, detail implementation steps).
Step 4 — Review and refine all three spec files
In this stage, I review the files: plan.md, requirements.md, and validation.md carefully. If something is wrong, I ask the agent to correct — this keeps requirements and the validation scorecard in sync.
Step 5 — commit the feature spec
Only after this commit I ask the agent to start implementation.
Phase 2: Feature Implementation
With the feature spec committed, let the agent implement it.
Step-by-Step: Feature Implementation
Step 1 — Clear the agent’s context
Start each implementation session fresh:
Step 2 — Send the implementation prompt
Read specs/feature-01/ and implement all task groups defined
in plan.md, following requirements.md.
Work in small commits, one task group at a time.
Step 3 — choosing the step size
┌───────────────────────────────────────────────────────────────┐
│                IMPLEMENTATION STEP SIZE OPTIONS               │
├───────────────────────────────────────────────────────────────┤
│                                                               │
│  ALL TASK GROUPS   Faster, more to review at once             │
│  AT ONCE           Best when you trust the spec fully         │
│                                                               │
│  ONE TASK GROUP    Smaller, easier to review                  │
│  PER PROMPT        Best for: security, auth, DB schema work   │
│                    Small mistakes compound less               │
│                    Especially useful in new codebases         │
│                                                               │
└───────────────────────────────────────────────────────────────┘
Step 4 — observe progress and review
I usually read the agent’s summary of its work (individual task groups) and review the diff of the changes.
Step 5 — running the app
I ask the agent to self-validate against validation.md at the end of implementation and run the app.
Phase 3: validation of the feature as a whole
Note on cognitive debt: Because agents generate code so fast, developers can accumulate cognitive debt — the mental load of tracking what the code is doing and how it has evolved. Keeping changes manageable and reviewing incrementally is how you keep this debt under control.
Step-by-Step: Feature Validation
Step 1 — Start with the commit view
I use the diff/commit view in the IDE and review changes at a high level:
- Does the feature work as described in the spec?
- Are the right patterns, components, and structures being used?
- Avoid reviewing CSS class names or variable names — focus on intent and architecture.
Step 2 — raising issues via the agent
If I find a code issue or a spec omission — I ask the agent to fix it, this keeps all artifacts in sync:
The Home component puts all three sub-components in a single file.
Please split them into their own files and update any spec
documents or README mentions that reference the file structure.
If a code mistake traces back to something ambiguous in the spec, I ask the agent to fix the spec so that the issue does not reappear.
Step 3 — run tests
Here review and run tests via IDE and use the IDE debugger to step through execution. If the testing framework wasn’t configured during implementation, add it via a replanning step (see Phase 4).
Step 4 — constitution updates within a feature branch
Small updates to the Constitution (e.g., checking off a roadmap step) can stay on the feature branch. If a larger constitutional change is needed, I create a separate branch for it so you can track which version of the spec produced which code.
Step 5 — Mark validation complete and merge
┌──────────────────────────────────────────────────────────────────┐
│                      VALIDATION CHECKLIST                        │
├──────────────────────────────────────────────────────────────────┤
│                                                                  │
│  [ ] Feature works as described in the spec                      │
│  [ ] All scorecard items in validation.md are satisfied          │
│  [ ] Code follows patterns established in the Constitution       │
│  [ ] Tests pass                                                  │
│  [ ] Related docs / specs updated for any scope changes found    │
│  [ ] Branch merged to main with a meaningful commit message      │
│                                                                  │
└──────────────────────────────────────────────────────────────────┘
Phase 4: Project Replanning
After every feature merge, I am careful not to immediately jump to the next feature. The replanning step updates the constitution, roadmap, and workflow to keep the whole process in sync.
What Replanning Covers
┌──────────────────────────────────────────────────────────────────┐
│                       THE REPLANNING STEP                        │
├──────────────────────────────────────────────────────────────────┤
│                                                                  │
│  A) CONSTITUTION UPDATES                                         │
│     • Add testing frameworks or tooling you settled on           │
│     • Record new architectural decisions made during impl        │
│     • Add responsive design requirements, new constraints, etc.  │
│     • Keep the living document current                           │
│                                                                  │
│  B) ROADMAP REVIEW                                               │
│     • Is the next roadmap item still the right thing to do?      │
│     • Can upcoming features be tackled together in one phase?    │
│     • Are there dependencies to re-order?                        │
│     • New info from stakeholders or product managers?            │
│                                                                  │
│  C) WORKFLOW IMPROVEMENT (Skills & Automation)                   │
│     • Package repetitive prompts into Agent Skills               │
│     • Create or improve changelog automation                     │
│     • Add linting, formatting, test-writing to validation step   │
│     • Decide: is this skill project-specific or global?          │
│                                                                  │
└──────────────────────────────────────────────────────────────────┘
Step-by-Step: Replanning
Step 1 — Create a replanning branch
Keeping constitution updates on their own branch lets you track which version of the spec produced which code.
Step 2 — Update the Constitution with what you learned
Example: adding a testing framework after the first feature revealed the gap:
Update specs/tech-stack.md to add Pytest as our testing
framework with these preferences: [...]

Also update specs/feature-01/requirements.md and the
implementation to add tests using this framework.
And if a product update comes in from stakeholders:
We just learned that our product will run on desktop as well as smart phones.
Update the product specs, feature specs, and any existing
code to emphasize the responsive design.
Guidance: If the new work triggered by a product update is small, implementing it during replanning is fine. If it’s large, I schedule it as its own feature on the roadmap instead.
Step 3 — agent Skills for repetitive workflow steps
I have used Claude to write skills (global or local per project) that captures the common prompts:
I want to stop repeating the feature spec prompt. Use your skill creator to help me write a "feature spec" local skill. Here is the previous prompt:

Find the next phase on specs/roadmap.md and make a branch, ask me about the feature spec. Create:

A new directory YYYY-MM-DD-feature-name under specs for this feature work
In there:
plan.md as a series of numbered task groups.
requirements.md for the scope, decisions, context
validation.md for how to know the implementation succeeded and can be merged
Refer to specs/mission.md and specs/tech-stack.md for guidance.

Important: You must use your AskUserQuestion tool, grouped on these 3, before writing to disk.
I want to keep a CHANGELOG.md in the project root, with headings for dates. If no changelog, examine git commits and add bullets for each date. Then, as we work, we will manually invoke this skill before merging. Help me write a skill for this.
Create a validation skill to with the following steps:
  1. Update CHANGELOG.md
  2. Run linter & auto-fix
  3. Run formatter
  4. Run test suite, report failures
  5. Ask agent to fix any test failures
  6. Update README if public API changed
  7. Commit with a standardized message format
Step 4 — Commit and merge the replanning branch
Managing AI Fatigue
As you begin each new feature, I establish a clean flow state before diving in. Running through this checklist prevents AI fatigue and context contamination between features:
┌──────────────────────────────────────────────────────────────────┐
│                  FEATURE KICKOFF CHECKLIST                       │
├──────────────────────────────────────────────────────────────────┤
│                                                                  │
│  [ ] All previous feature work committed and merged to main?     │
│  [ ] Constitution updated with learnings from the last feature?  │
│  [ ] Roadmap reviewed — is this still the right next feature?    │
│  [ ] Agent context cleared (/clear)?                             │
│      (Ensures specs capture intent, not memory snapshots,        │
│       and focuses the agent's limited context budget on          │
│       the next task only)                                        │
│  [ ] New feature branch created?                                 │
│  [ ] Fresh feature spec prompt ready to send?                    │
│                                                                  │
└──────────────────────────────────────────────────────────────────┘
Strategies to Combat AI Fatigue
Agents can generate massive amounts of code very quickly, making the human-in-the-loop review exhausting. Use these strategies:
- Review at a high level — does it match the spec and reflect your intent?
- Don’t nitpick variable names, CSS classes, or minor style choices
- For complex areas (security, database schema), implement one task group at a time
- Use the agent’s sub-agent review for a thorough second look: ask the agent to spawn several sub-agents to do a deep review of the entire project with the feature change. Sub-agents give the review more reasoning space and preserve the main agent’s context window rather than polluting it.
- When you find an omission (e.g., “prop types should be in a standalone TypeScript type file”), fix the code via the agent and update the spec — it will apply automatically to all future features.
Shipping an MVP
If I am confident in the constitution, I sometimes build the rest of the roadmap in a single pass to produce, for example, an MVP.
Brownfield / Legacy Projects
I have used SDD for new and existing codebases:
┌───────────────────────────────────┬───────────────────────────────────┐
│          GREENFIELD               │            BROWNFIELD             │
│       (New project)               │       (Existing codebase)         │
├───────────────────────────────────┼───────────────────────────────────┤
│ Draft Constitution via            │ Agent generates Constitution by   │
│ conversation with agent           │ reading existing code             │
│                                   │                                   │
│ Agent asks questions to           │ Agent extracts: file structure,   │
│ discover your preferences         │ framework versions, patterns,     │
│                                   │ then asks clarifying questions    │
│                                   │                                   │
│ Roadmap starts from scratch       │ Roadmap aligns to existing        │
│ based on your product vision      │ TODO.md, issue trackers, or docs  │
│                                   │                                   │
│ Feature loop begins immediately   │ Feature loop begins immediately   │
│ after Constitution is committed   │ after Constitution is committed   │
└───────────────────────────────────┴───────────────────────────────────┘
Step-by-Step: Recipe for Onboarding a Legacy Project
Step 1 — Gather existing documentation
Collect README.md, TODO.md, issue tracker exports, any architecture docs, and existing product requirement documents. Your legacy project might have plans in spreadsheets, Word documents, or Jira — add as much context as you can.
Step 2 — Send the legacy Constitution prompt
The prompt is nearly the same as for a greenfield project, with one key addition: tell the agent to look for roadmap items in existing artifacts.
I am introducing Spec-Driven Development to an existing project.
Please read all files in this directory and generate a Constitution:

  specs/mission.md      — based on the README and any product context
  specs/tech-stack.md   — based on the actual frameworks, versions,
                          and file structure you find in the codebase
  specs/roadmap.md      — based on TODO.md and any outstanding work

The agent will discover and in a sense reverse-engineer the SDD
artifacts from the existing codebase. Ask me questions to fill
any gaps you cannot determine from the code.
Step 3 — Review and commit
Review all three files and correct any incorrect assumptions the agent made to fill gaps and then commit.
Step 4 — Continue with the standard feature loop
From this point, the workflow is identical to a greenfield project. The spec is now the memory of the project — it does not fade. The Constitution helps align all future code changes made by the agent with what past developers have already created.
Building and Automating Your Own Workflow
Once you are comfortable with the core loop, begin automating and customizing using:
MCP servers
I generally use the context7 MCP server to let the agent review the latest set of documentation.
Research Backlogs
When you have an idea mid-feature that you want to explore without committing to it, use a research backlog:
I want to explore switching to Turso for our database.
Research this topic with me, but do not add it to the roadmap yet.
When we are done, write a report to specs/research/turso-db.md.
You can later ask the agent to schedule the research on the roadmap with a link to the backlog file. As your research backlog grows, write a skill to automate the research workflow.
Key Principles Summary
The complete SDD process distilled into one reference:
╔══════════════════════════════════════════════════════════════════════╗
║           SPEC-DRIVEN DEVELOPMENT — COMPLETE REFERENCE               ║
╠══════════════════════════════════════════════════════════════════════╣
║                                                                      ║
║  CONSTITUTION  (Once per project — a living document)                ║
║  ──────────────────────────────────────────────────────              ║
║  mission.md     → The WHY   (vision, audience, scope)                ║
║  tech-stack.md  → The HOW   (frameworks, constraints, schema)        ║
║  roadmap.md     → The WHAT  (features, phases, sequence)             ║
║                                                                      ║
║  FEATURE LOOP  (Repeat for every feature)                            ║
║  ──────────────────────────────────────────────────────              ║
║  1. SPECIFY    New branch  →  /clear  →  interview agent             ║
║                Commit plan.md, requirements.md, validation.md        ║
║                                                                      ║
║  2. IMPLEMENT  /clear  →  implement prompt                           ║
║                Review diffs as the agent works                       ║
║                Small, frequent commits                               ║
║                                                                      ║
║  3. VALIDATE   Code review at a high level                           ║
║                Fix via the agent (keeps specs in sync)               ║
║                Run tests & validation scorecard                      ║
║                Merge feature branch to main                          ║
║                                                                      ║
║  4. REPLAN     Update the Constitution with what you learned         ║
║                Review and adjust the roadmap                         ║
║                Package repeated prompts as Agent Skills              ║
║                                                                      ║
║  ALWAYS                                                              ║
║  ──────────────────────────────────────────────────────              ║
║  • Clear context (/clear) at the start of each major step            ║
║  • Dedicated branch per feature — and per replanning cycle           ║
║  • Human-in-the-loop: YOU decide, the agent elaborates               ║
║  • Steer at the right altitude — goals, not variable names           ║
║  • When you find a gap, fix the SPEC — it is the project memory      ║
║  • Commit often — small steps compound into great results            ║
║                                                                      ║
║  ANTI-PATTERNS TO AVOID                                              ║
║  ──────────────────────────────────────────────────────              ║
║  ✗ Skipping the spec and starting implementation directly            ║
║  ✗ Editing spec files manually instead of via the agent              ║
║  ✗ Carrying context forward across features without /clear           ║
║  ✗ Nitpicking low-level code instead of reviewing intent             ║
║  ✗ Rushing to the next feature without replanning                    ║
║  ✗ Implementing a large chunk on a weak Constitution                 ║
║                                                                      ║
╚══════════════════════════════════════════════════════════════════════╝
Closing Thoughts
“The best code starts with a great spec.”
The specs you craft, the Constitution you maintain, and the workflow you automate are what separate a thoughtfully engineered software product from a pile of AI-generated code that only one session ever understood.
Start small: pick your next feature, write a spec before writing any code, and see how much more confidently and consistently the agent delivers.